SKINHELP SECTION - Quake3 Model Viewing
The Visor Model
At
the moment theres one model thats been released with the Quaketest and so I
will attempt to guide you thru the pitfalls of skinning it.
All models have pitfalls, and they can ALL be avoided if you spend al ittle
time thinking first and skinning later.
Above
is the visor model and its mesh on the right (feel free to click and save the
meshs).
Like I mentioned in the Introduction , a lot of the skin mirrors itself, but
each area mirrors in different ways..
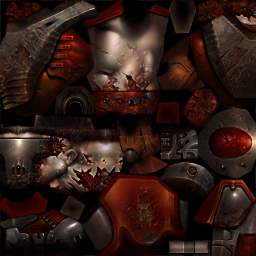
Below is another mesh and a blowup of it on the model so you can understand its translation to 3d. I cannot stress strongly enough how important it is to understand the 3D nature of what your skin goes onto..


Right, perhaps this makes things a little clearer, I've used the lighter shades of each colour to try to demonstrate a little the shape of the model and where best to put the majority of your work when skinning it.
As you can see its complicated at first so I will start with the Problem Areas...
Problem Areas
The first main problem area is the Visor on the face (purple). The top part of the visor is way up at the top right corner of the mesh (bright yellow), so bear that in mind when trying to do a fancy grill on the top of he face by painting on the purple area (where you might have asumed the top of visor was). Another problem area is that light purple to the immediate left of the Back (green), it cuts across the Bum (grey) but it goes under the shoulder on one side of the skin, so make sure the tones on these areas are same colour and darkness then its unoticable.
Be carefull also around the Thighs(red), the bottom area is folded behind the knee (olive green), so dont put nice detailled touches at the bottom of the thighs, and remember the red section on the far left is the top of the thigh.
The best thing for you do to learn this model is to take my coloured wireframe base and look at it on the model along with the blowup I have made and see how it corresponds in each instance.
Most of the section work like a rorschach ink blot (i love usuing this comparison!), but some places like the face are not completly symetrical, you can get away with adding very slight difference on the left side of the face for instance. Look above and you can see this. theres a set of triangles for each side of the visor part of the model..
Clan Logos
Mostly your going to be screwed in making these, you can do them on the shoulder pad safely, also the side of the head perhaps, but ultimately writing that is correct on one side will be mirrored on the other. Now I worked around this by making the Name tag for Eat Electric Death (EED) going vertically down the back of the skin, because EED is symetrical when vertical.

This is why you must understand a model, skinning it is partly problem solving. If your caln was called Taking out Trash (TOT) then you'd be sorted for putting that anywhere wouldnt ya? hahah (got anymore cool letter arrangements that repeat everyway? mail me!)
Will this I wonder start a cool new trend of people inventing symetrical rorschach logos? :)
Shading
From what I have learned the Renderer in Quake3 makes the shades at the lighter end of the scale VERY bright and likewise the Darker shades get very dark too. What this means is that you MUST change your shading style to match Quake3's engine, you have to use ALL the tones in each spectrum as evenly balanced as you can or the contrast inbetween each INGAME will look too harsh and strong.
This is why my skins are a little more evenly shaded now and not so reliant on highcontrast, its the way we have to be to skin in Quake3.
Things you will need..
Before you begin you need to go to the Model Viewing Page and follow the link to get a Viewer.
You need to Download the Visor Model
You need to grab a copy of my meshes above