Skinmapping - The Mole
This Tutorial was originally produced
for the Polycount Messageboard. A lot of modellers
had been getting complaints from skinners about bad mesh coordinates and I sought
to
try to help cure this problem by using Hypers already 'good' mesh as an example.
I tried
to highlight what it is exactly that a skinner wants in a mesh and point out
the
differences in thinking between a modeller and skinners workarounds.
Before I begin dissecting it I want to thank him again for allowing me to do
this as I am
essentially telling him and others that he did it wrong and that I have done
it better. It
takes a fair measure of humility to take such comments the correct way and I
appreciate
that he is being such a good sport in allowing me to do this.
So please take the time to thank him for being good about this as its deserving
of both
mine and your respect.
-----------
I'll begin by discussing what changes I made.
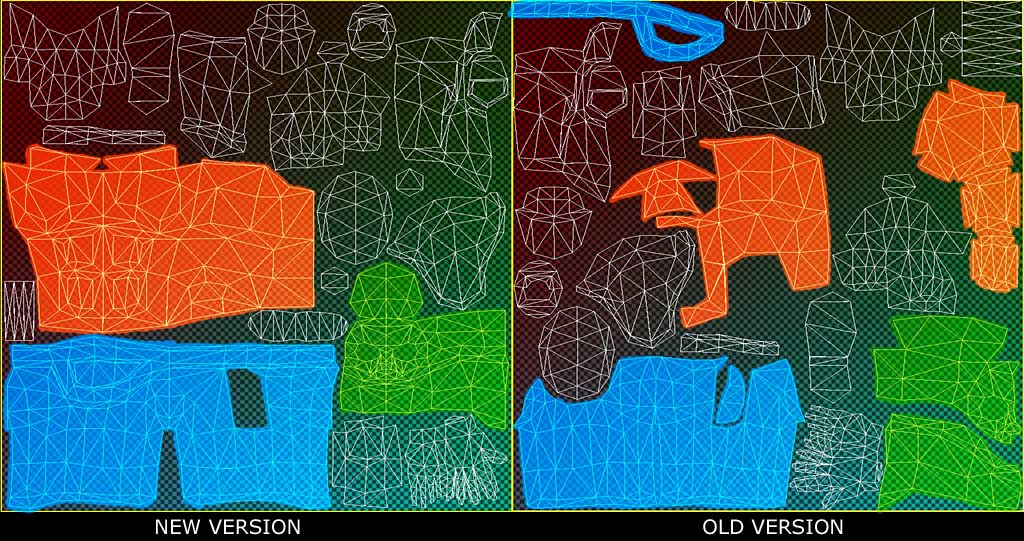
The main problem that I saw with the mesh was the fragmentation of the key
areas of
the model. Namely, the Chest, Head and Legs.
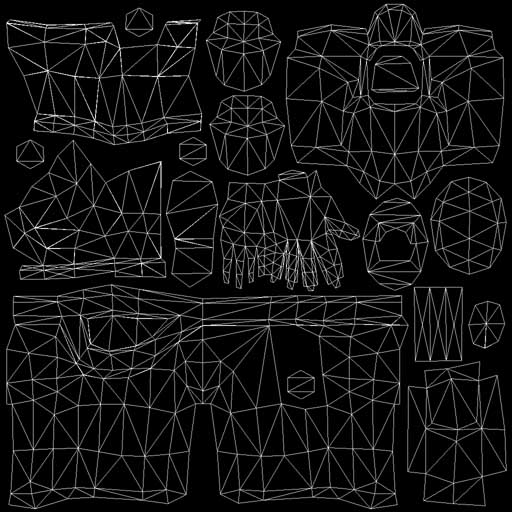
If you look at the above image you can see that..
Orange is the Chest
Blue is the Legs
Green is the Head.
CHEST -
To remap the the chest I simply seperated all teh chest and back pieces from
teh rest
of the model and applied a Cylindrical unwrap to it. This took care of 75% of
the work.
Once that was done I had to compensate for the Bevel around the Abs, Chest and
hip
protrusions.
This was easy. I simply selected the vertex's of each Ab and contracted which
had the
result of growing more coverage for the bevels and reducing the coverage for
the flat
center area of each. I repeated the process for the Chest.
The Hips were harder, it took a lot more fiddling. I basically pulled a little
extra coverage
from the entire side portion of the torso. It leaves the model with a weird
sort of warp
all over that area, but its minimal and in an area that isnt as central to the
characters
appearance... so that was ok!
Then I subtracted the top bevel of the chest from the torso and remapped it
seperatly
with a planar unwrap and reconnected it as I couldnt have it one piece without
extreme
warping and although it wouldnt have been VERY visible, it would still have
been noticeable.
LEGS -
I just flipped and tweak the legs from the original map so that teh seam was
at the ass
rather than the groin. I then connected the belt to the legs and hid the majority
of the
warping in the underside of the belts bevel.
Pretty simple formulaic process, just takes a little patience.
HEAD -
I combined the neckpiece and head piece and applied a cylindrical unwrap and
then
tweaked the nose piece.
--------
For ALL these mesh areas , after i do the clyindrical unwrap I then select
1 half of the
unwrap and flip it, then combine it with the other side so that its perfectly
mirrored.
This process is a little messy, you generally then need to invidually weld the
vertex's
so they are identical and it can get confusing for a while.
This IS necessary tho. It ensures that any little change you make is global
and then
when your satisfied with the unwrap you can just select the whole of it, and
deselect
one side in the 3d view, then flip that half again and shift it into position.
The advantage of this is that then when a skinner comes to work on it, they
are really
just drawing one half of the model and flipping and they can then be sure that
it will align.
------------
WHY I altered what I did.
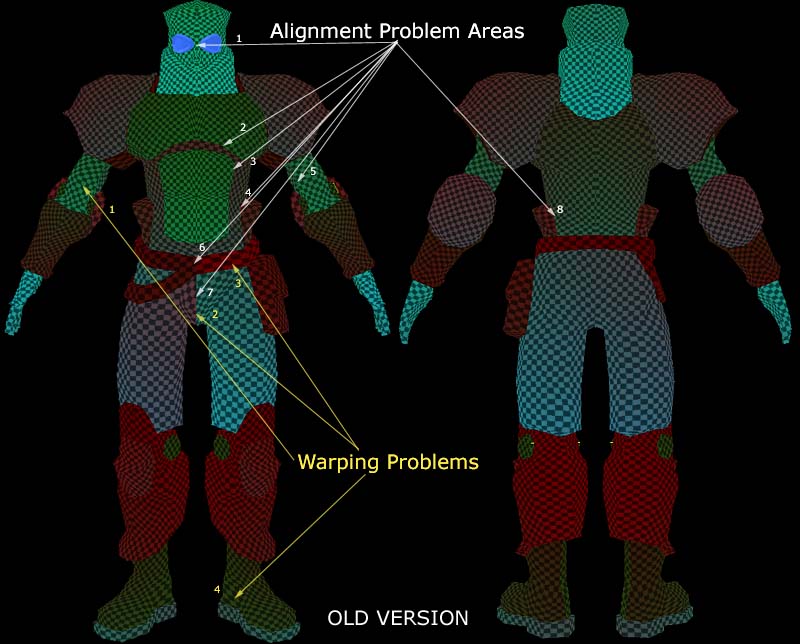
If you look above you can see I have identified each of the problems of the
old mesh
clearly as this is the best way to explain why i changed things.
ALL of the seams of alignment problems are on the front of the model and this
means
that the skinner will spend double the amount of time to skin it than they should
as any
mistake made with alignment is right there, on the front.
The worst area was the groin, the groin is one of the areas that will always
stretch a
lot during anims, just like the waist. So again, any misalignment's clarity
will be
compounded more during anims.
Alignment Problems in Detail
1 The Face mesh is completly mirrored and
the mirror point at the nose is not a straight line,
this means things are going to get very fiddly. If you ARE going to mirror things,
the point at
which the texture is mirrored should be a straight line if possible.
The reason the mirror point should be on a straight line is because the point
where it is
mirroring in this case ( the groin, the middle of the face) is a straight line.
2/3/4/5 All the abs, chest and hip pieces
were on seperate areas.This makes skinning the
torso a complete nightmare rather than the easy process that it should be. The
chest is
the centerpiece of a model, it should be able to accomadate lavish logos etc.
When it
is laid out in seperate pieces , most skinners will opt for the easy route of
just making
each piece plain so its easy to align.
6 The Belt needs to be aligned in the center
, above the groin, and each side has a
different texture space ration from the other. Again this is a nightmare to
skin.
7 The groin needs to be aligned in center
and each sides ratio is different and the mesh
pieces arent on a straight line, they are each at angles, different angles.
Nightmare.
Warping Problems in Detail
1. The center of the bicep is warped, its
a key area so the warp should have been moved
to a less visible area.
2. Groin has already been covered in teh
alignment probs list.
3. same as above.
4. theres neglible warping on the boots,
i suppose tho, tbh, as its in the inside which
will be seen rarely i shouldnt really mention this.
Solutions to Problems
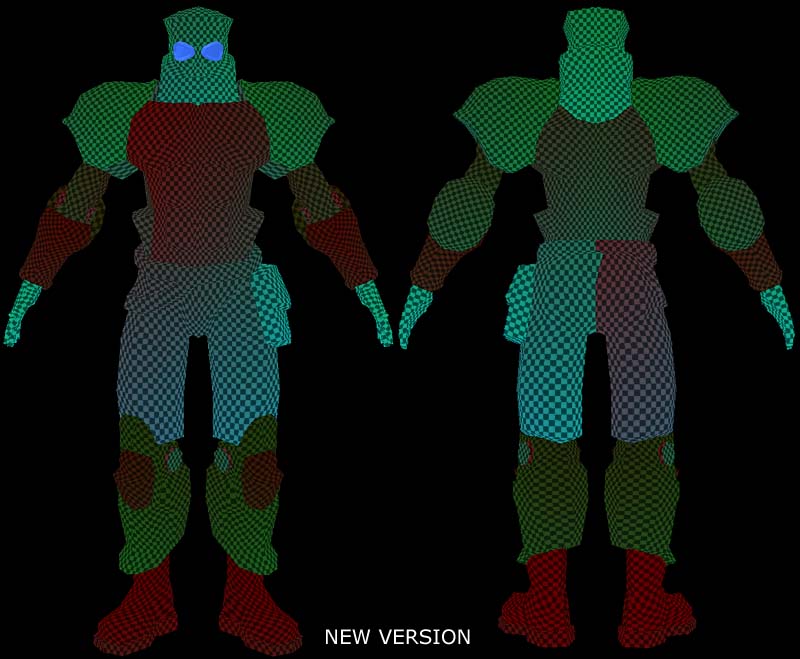
Globally I removed all the front seams to the side of the model or the back.
To ensure that nothing is hard to align I also made sure that the edge of each
mesh
area that needs to connected with another edge is running parallel and accurate
to 1
pixel.
Doing this means that when a skinner finds they have misaligned something,
they can
simply cut/paste/flip one side of the texture and move it over to the other
side for
an accurate guide.
A good example of this is on the Torso and the ass.
There are a couple of warped areas still on the model that I left. The inside
of the
boots are still warped and parts of the belt are a little warped also but its
neglible
and in areas that wont be seen clearly during anims.
-----------
So there you go , thats example 1 in a continuing series.
Hyper had already done a great job, the only REAL problem with the mesh he has
done
was that he had focused too clearly on the shape of the model and stuck to that
as a
guide for the mesh.
The better way to go is to be thinking in terms of how it will need to be drawn
on a skin
later and try to produce a mesh shape that is easier to skin in such a way as
each piece
looks like the shape it will on the model.
There were quite a few pieces i didnt even alter as he'd already found the
best way to
do it already such as on the lower legs and shoulder pads , kneepads, sidepocket.
---------
Eventually Hyper told me this model was set for Unreal2 and Unreal Championship...
so I tweaked the model some more and came up with some ways to get more
texture coverage and make some areas easier still as you can see in the final
version.
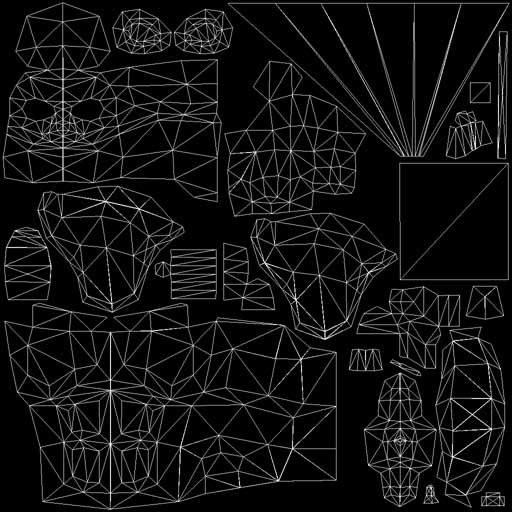
You can download the model here.